Lesson 5 - Advanced PowerPoint
PowerPoint is definitely the easiest of the Office Applications to master. I have called this "Advanced PowerPoint", but there really isn't anything too difficult in PowerPoint.
I am assuming that you all know a bit about PowerPoint and how to create a presentation and apply a theme to make a plain presentation look really swish, so today I will show you how to create your own theme.
I am assuming that you all know a bit about PowerPoint and how to create a presentation and apply a theme to make a plain presentation look really swish, so today I will show you how to create your own theme.
*******************************************************
Please let me know if anyone needs a refresher on using PowerPoint
*******************************************************
Start by loading PowerPoint using a Blank Presentation.

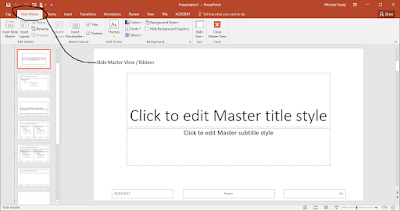
To be able to create or change a Theme, you need to change the view to Slide Master. You can access this from the View tab.
Your presentation area will now contain the "Master" versions of all of your slides.
Once you are in Master Slide View, you can customise and create your own Template. Many organisations will have their own template for presentations - this allows a consistent look and feel within the organisation. Chisholm has one that staff can download from our Intranet and use for any Chisholm Presentations.
This is what the Slide Master View ribbon looks like. It gives you access to a range of tools that can be used to create/modify Slidemaster templates, slide layout, colours, and more.

Start by deciding which elements you want on each slide - things like date and slide number.

Click on the Master Layout button to access this menu.

NOTE: In Slide Master view, these are just placeholders. To actually include a Header or Footer, you need to be in normal view and click on the Header/Footer button on the Insert Ribbon. Put a tick next to the items you want and then Apply to all to include it on every slide.

Placeholders are used to design each slide layout. A placeholder in Slidemaster view also has no actual content - you add the content in normal slide view. Placeholders are a section on your slide that allows content to be added to the slide. You can choose the type of placeholder that is on each layout slide of your theme.

NOTE: Make sure you are at the top of the tree in the slide navigation pane if you want to apply the background to all of your layout slides.
You can start by changing the background colour. Use the various tools within the Background section of the ribbon. You can have a solid colour, a gradient, or even an image as a background. With images, you can control the transparency to allow for a nice subtle background.
Here are a few variations - Solid colour, gradient, texture and images.


In this sample, I used a solid background and placed some shapes on it to give it a bit of interest. To make sure that the shapes are behind any text, you can use the send backwards option.


To see what your new theme looks like, just close the SlideMaster view

Use the Themes button to select an existing theme to modify.


The above example uses an existing theme, but with a change of font and bullets
To save as a PowerPoint Template, go to File / Save As and Choose PowerPoint Template as the file type (.potx)


To use the template, you can double click the file to open it or you start PowerPoint and select the template from your custom templates.

Alternatively, you can save your design as a Theme.
To save as a Theme, Select Save Current Theme (.thmx)


The main difference is how you use the design for a presentation. A template is a file that is opened and you see the theme straight away. A theme is applied to a blank presentation.


This will change the order of the items in a stack.
The following example has a starburst behind a shape. See what happens when it gets moved forward.


Here is a sample template for Mysty River Regional Library Corporation.

The Handout Master is used to set up or change the way your presentation prints. Often when you go to a presentation, you are given handouts for the presentation. Handouts is one of the options you can select when printing your presentation. In Handout Master view, you can change the way these look in regards to headers, Footers and page numbers.


Creating a Template/Theme
Start by loading PowerPoint using a Blank Presentation.

To be able to create or change a Theme, you need to change the view to Slide Master. You can access this from the View tab.
Your presentation area will now contain the "Master" versions of all of your slides.

Once you are in Master Slide View, you can customise and create your own Template. Many organisations will have their own template for presentations - this allows a consistent look and feel within the organisation. Chisholm has one that staff can download from our Intranet and use for any Chisholm Presentations.
This is what the Slide Master View ribbon looks like. It gives you access to a range of tools that can be used to create/modify Slidemaster templates, slide layout, colours, and more.

Start by deciding which elements you want on each slide - things like date and slide number.

Click on the Master Layout button to access this menu.
NOTE: In Slide Master view, these are just placeholders. To actually include a Header or Footer, you need to be in normal view and click on the Header/Footer button on the Insert Ribbon. Put a tick next to the items you want and then Apply to all to include it on every slide.

Placeholders
Placeholders are used to design each slide layout. A placeholder in Slidemaster view also has no actual content - you add the content in normal slide view. Placeholders are a section on your slide that allows content to be added to the slide. You can choose the type of placeholder that is on each layout slide of your theme.

Backgrounds
To create a nice background, you can add an image, shapes, gradient, or solid colour.NOTE: Make sure you are at the top of the tree in the slide navigation pane if you want to apply the background to all of your layout slides.
You can start by changing the background colour. Use the various tools within the Background section of the ribbon. You can have a solid colour, a gradient, or even an image as a background. With images, you can control the transparency to allow for a nice subtle background.
Here are a few variations - Solid colour, gradient, texture and images.


In this sample, I used a solid background and placed some shapes on it to give it a bit of interest. To make sure that the shapes are behind any text, you can use the send backwards option.


To see what your new theme looks like, just close the SlideMaster view

Modifying an existing Theme
As well as creating a new theme, you can also modify an existing theme - one of your own or one of the standard themes that come with Office 2016.Use the Themes button to select an existing theme to modify.


The above example uses an existing theme, but with a change of font and bullets
Saving your Template/Theme
You have two options when it comes to saving your new Master Template.You can save it as a PowerPoint Template, or you can save it as a Theme. Both options are OK, but will have two different ways of using your design.To save as a PowerPoint Template, go to File / Save As and Choose PowerPoint Template as the file type (.potx)


To use the template, you can double click the file to open it or you start PowerPoint and select the template from your custom templates.

Alternatively, you can save your design as a Theme.
To save as a Theme, Select Save Current Theme (.thmx)


The main difference is how you use the design for a presentation. A template is a file that is opened and you see the theme straight away. A theme is applied to a blank presentation.

Useful Formatting Tools
When you are creating your theme, remember some of the tools that will help you!!Transparent Colour in Images
Remove Background
Grouping Shapes
Bringing Forward or sending Backwards
This will change the order of the items in a stack.
The following example has a starburst behind a shape. See what happens when it gets moved forward.
Here is a sample template for Mysty River Regional Library Corporation.

Handouts Master
The Handout Master is used to set up or change the way your presentation prints. Often when you go to a presentation, you are given handouts for the presentation. Handouts is one of the options you can select when printing your presentation. In Handout Master view, you can change the way these look in regards to headers, Footers and page numbers.
Notes Master
The Notes Master view is similar to the Handouts Master. You can add footers, headers, page numbers and whether or not you want the actual slide text as part of the notes.


Comments
Post a Comment